Introduction
Here is a pattern that plays out in households across the country every few months. The clutter gets overwhelming. Someone decides today is the day. They drive to The Container Store or scroll through Amazon for an hour, spend $80 to $150 on matching bins and labels and drawer dividers, bring them home full of motivation, and set everything up. It looks great for about two weeks. Then life happens, and slowly the new containers just become more organized-looking clutter on top of the original clutter.
Sound familiar?
The storage products industry is enormous, and it is built on a very specific belief: that you need to buy the right containers to get organized. This belief is almost entirely backward.
In my experience working with families who have genuinely transformed their homes, the ones who spent the most on organizing products were rarely the most organized. The ones with the most sustainable, functional systems were the ones who figured out what they actually needed to store, reduced everything else, and then used whatever they already had to contain what remained.
The truth is that most homes already contain more than enough containers, baskets, jars, boxes, and storage vessels to organize everything in them. They just haven’t been identified and used with intention.
This guide will walk you through a complete, room-by-room home management and organization process that costs exactly nothing. No new purchases required. No trips to the store. Just a clear process, a fresh set of eyes on what you already own, and a willingness to be creative about what things can do.
Why No-Buy Organizing Works Better
Beyond the obvious benefit of saving money, organizing without buying anything new has several practical advantages that most people don’t consider.
It forces you to declutter first. When you can’t buy more bins to contain the overflow, you have to reduce the overflow. This is actually the correct order of operations. As the Organize Your Home Step by Step guide explains, decluttering before organizing is always the right sequence. No-buy organizing enforces this naturally.
It prevents the “wrong container” problem. One of the most common and expensive organizing mistakes is buying storage products before you know exactly what you’re storing and how much of it there is. You end up with bins that are the wrong size, the wrong style, or the wrong quantity. When you work with what you have, everything fits because you’re adapting to what you own rather than hoping what you bought will fit.
It’s more sustainable. Buying plastic bins and containers, many of which eventually end up in landfills, to manage overconsumption is its own kind of irony. Using what you already own is genuinely better for the environment and for your budget simultaneously.
Results come faster. You don’t have to wait for an Amazon delivery or a free Saturday for a Target run. The resources are already in your home. You can start right now.
Step-by-Step No-Buy Organization Process
Follow these steps in order. Skipping steps, especially the first two, is what leads to no-buy organizing attempts that don’t hold up.
Step 1: Declutter before anything else. You cannot organize your way around too much stuff, and you definitely cannot do it without buying new storage if you still have more items than your existing containers can hold. Before looking at a single storage solution, remove everything that doesn’t belong in your home. Donate, trash, and relocate items until what remains is what you genuinely use and need.
Step 2: Do a full home audit of what you already have. Before touching any room, walk through your entire home and gather every storage vessel you own. Shoeboxes. Baskets. Glass jars. Decorative bins. Trays. Boxes from shipped packages. Collect them all in one place so you can see exactly what you’re working with. Most people are genuinely surprised by how many containers they already own.
Step 3: Sort your existing containers by size and type. Small containers for small items. Large bins for bulky items. Open baskets for things that need frequent access. Lidded boxes for things stored less often.
Step 4: Match containers to categories, not rooms. Instead of thinking “I need something for the kitchen,” think “I have a lot of small packets and clips that need containing.” Match the container to the category of items based on size and access frequency.
Step 5: Set up one room at a time. Starting with the room that causes you the most daily stress, set up your system using only what you’ve collected. Label everything clearly using masking tape and a marker, which you almost certainly already own.
Audit What You Already Own
Before you can use what you have, you need to know what you have. Here’s a room-by-room list of what to look for during your home audit.
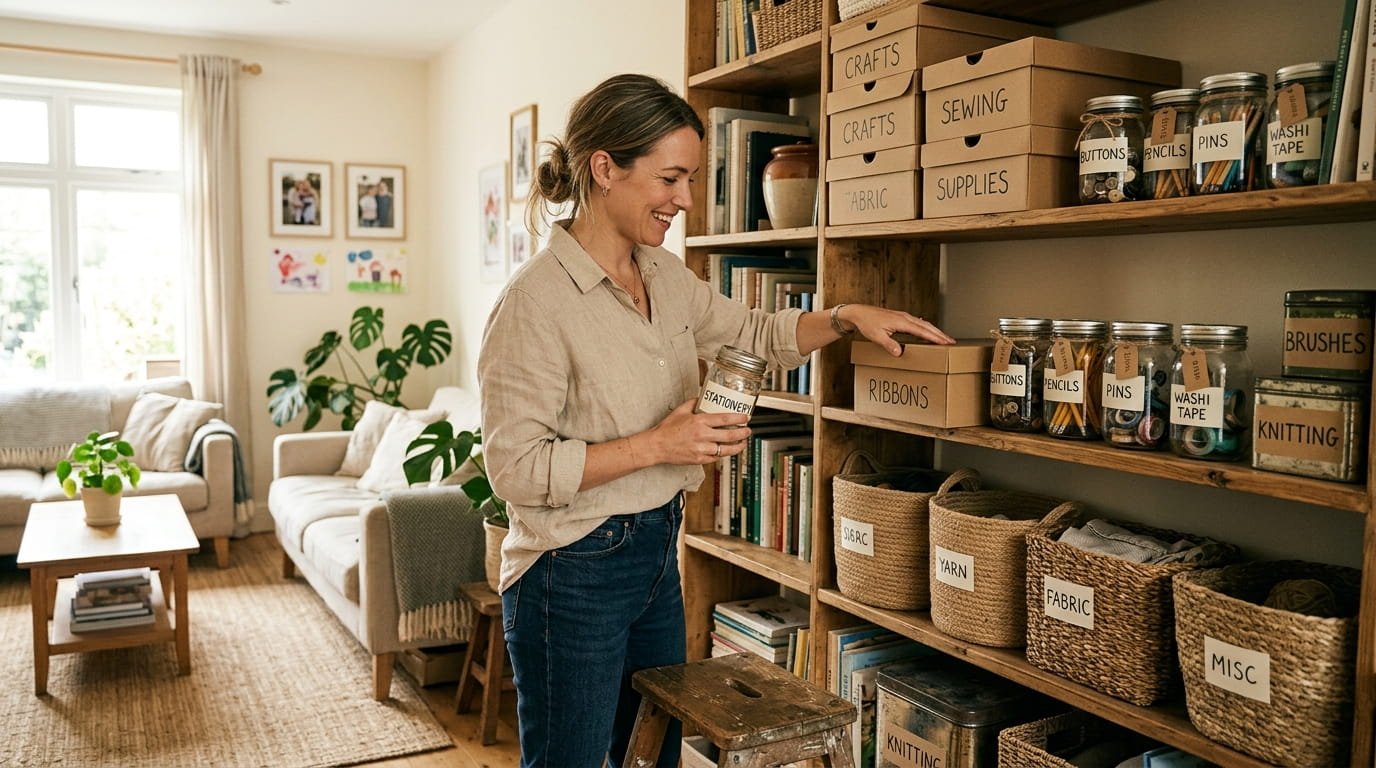
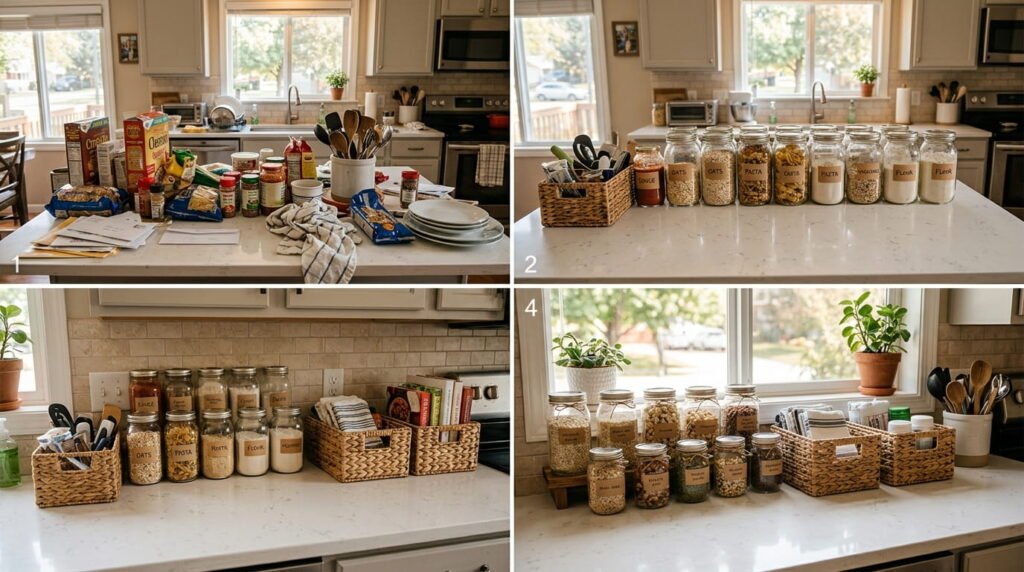
Kitchen and pantry: Mason jars, food containers with lids, muffin tins, baking dishes, pitchers, bowls, trays, and any baskets or bins currently holding random items.
Bedroom and closet: Shoeboxes (these are genuinely excellent organizers), decorative boxes, baskets from old gift sets, hat boxes, and any fabric bins or bags.
Living room: Decorative baskets, trays, boxes, magazine holders, and any lidded ottomans or benches.
Bathroom: Small baskets, cups and glasses not currently used, small trays from perfume sets or candles, and any plastic containers with lids.
Office and junk areas: Pencil cups, document trays, small boxes, binders, and file folders.
Gift wrap and holiday storage areas: Boxes from gifts, decorative tins from holidays, and bags with handles that could function as organizers.
Write everything down or take a quick photo of your collection. This is your inventory. This is your toolkit.
Repurposing and Relocating Techniques
The most powerful no-buy organizing move is repurposing items you already own for organizational purposes they weren’t originally intended for. Here are the techniques that work best.
Relocate before repurposing. Many homes have perfectly good storage containers sitting in the wrong room. The basket in the guest room that holds nothing useful. The nice tray on the bedroom dresser that’s been collecting pennies for three years. Moving these items to where they’re actually needed costs nothing and often solves the problem immediately.
Vertical repurposing. Items that hold things vertically, like vases, pitchers, tall glasses, and utensil crocks, can organize vertical items like spatulas, scissors, pens, and markers anywhere in the home, not just in the kitchen.
Tray as a zone creator. A tray placed on any flat surface instantly creates a visual boundary that says “this is where these specific things live.” A tray on a bathroom counter contains the items that belong there. A tray on an entryway table holds keys and sunglasses. The same principle works on a coffee table, a dresser, or a home office desk. You almost certainly own at least two or three trays already.
Cereal and cracker boxes as drawer dividers. Cut down to the appropriate height, covered with kraft paper or contact paper if you want them to look intentional, these create effective drawer dividers in kitchen drawers, bathroom drawers, and kids’ room drawers.
Ice cube trays and muffin tins as organizers. In a junk drawer or office drawer, an ice cube tray holds small items like batteries, paper clips, rubber bands, and thumbtacks in individual sections better than most purchased organizers.
Tension rods from the bathroom. If you have a spare tension rod anywhere in the home, it can be installed inside a cabinet to hold spray bottles vertically, create a second level for mugs, or divide a deep shelf into two usable zones.
Best No-Buy Storage Ideas by Room
Kitchen
- Use mason jars on the counter or a shelf for dried goods, utensils, and small items
- Stand cutting boards and baking sheets vertically in a cabinet using a tension rod or the gap between the cabinet wall and existing items
- Use a muffin tin in a kitchen drawer to separate small items like batteries, rubber bands, and takeout menus
- Place a small tray near the stove to corral oils, salt, and pepper so they have a defined home instead of spreading across the counter
- Use a deep pot or Dutch oven you already own as a catch-all for other pot lids that don’t stack well
Bedroom and Closet
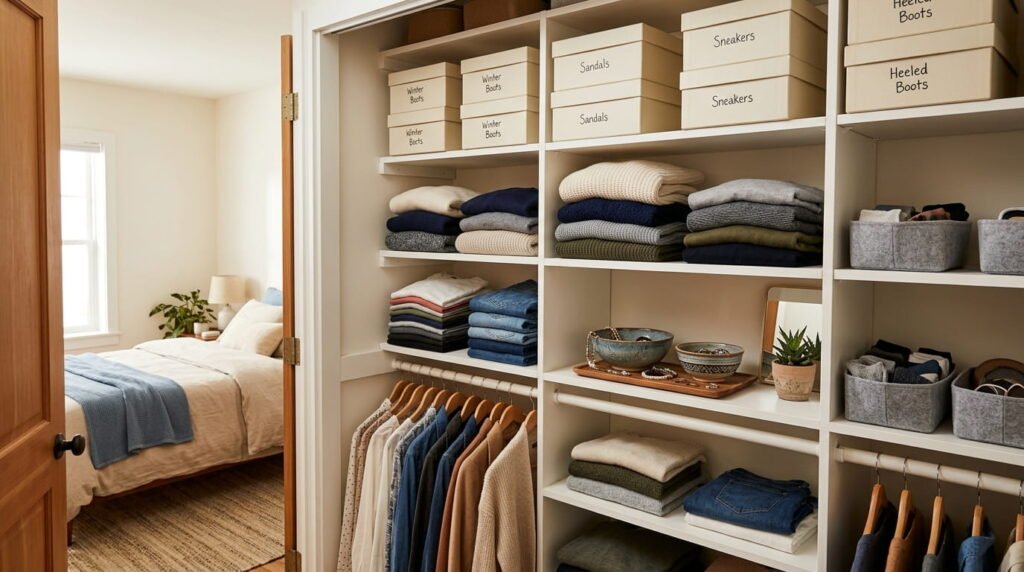
- Shoeboxes covered in wrapping paper or brown paper bags make attractive, free drawer dividers and shelf organizers
- Use an over-the-door hook (which you likely already own somewhere) on the closet door for bags and accessories
- A decorative bowl or dish from elsewhere in the house placed on the dresser instantly organizes jewelry, watches, and small accessories
- File-fold all drawer contents, which costs nothing and immediately increases drawer capacity significantly
Living Room
- Use a large basket or bin you own for toy containment in the living room
- Repurpose a decorative crate or box as a side table with hidden storage
- Use a tray on the coffee table to give remote controls and small items a defined home
- Repurpose a wine rack as a blanket and throw storage unit beside the sofa
Bathroom
- A small cup or glass you no longer use holds toothbrushes and toothpaste without buying a holder
- A shallow dish or decorative soap dish organizes daily-use jewelry removed during hand-washing
- Stack towels vertically in a basket you already own rather than folding them flat in a cabinet
- Use a small tray under the sink to group cleaning products and prevent them from tipping
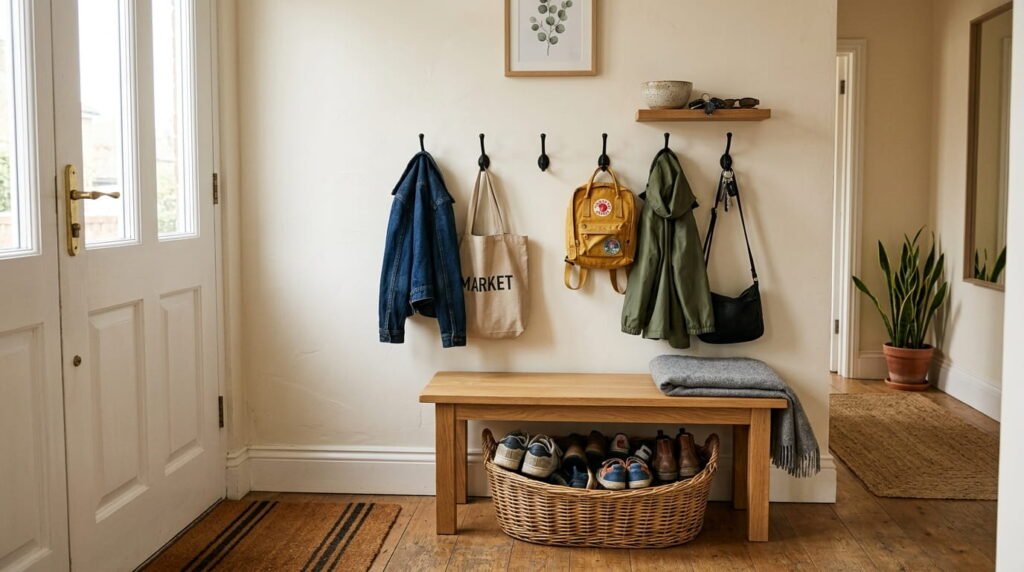
Entryway
- A basket or bin from another room becomes a shoe bin by the door
- Hooks you already have in a closet can be remounted in the entryway if they’re not being used where they currently are
- A small bowl or dish from the kitchen becomes a key and sunglasses drop zone
Creative Hacks Using Household Items
Some of the best organizing tools in your home aren’t even containers.
Binder clips on the edge of a desk or shelf hold cables in place, keeping them from sliding behind furniture. They also clip bags of chips and snacks closed in the pantry, eliminating the need for chip clips.
Rubber bands around a hanger prevent clothes from slipping off, which is especially useful in a closet where certain items never stay put.
Shower curtain rings clipped onto a single hanger hold up to 15 scarves, belts, or tank tops. One hanger, 15 items, massive space savings at zero cost.
Bread tags and tape work as cable labels. Wrap a small piece of masking tape around a cable and write what it connects to. You’ll never spend five minutes tracing cables again.
A stair basket or bin placed at the bottom of the staircase holds items that need to go upstairs. Family members grab from it as they go up. Simple, free, and surprisingly effective at keeping floors clear.
Mindset Shift: Consume Less, Organize More
One of the most important long-term realizations in home organization is that clutter is not solved by adding more storage. It is solved by having less stuff relative to the storage you already own.
Every time you feel the impulse to buy a new organizing product, ask one question first: “Have I fully used the storage I already own?” For most families, the honest answer is no. There are baskets in rooms that are holding nothing useful. There are bins that are storing things that should have been donated years ago. There is a kitchen drawer full of gadgets that would be more valuable as free space.
Read: 10 Home Organization Mistakes article for a deeper look at how buying organizers before decluttering is one of the most common and expensive traps families fall into. Knowing the mistake in advance makes it much easier to avoid.
How to Maintain Without New Purchases
Maintaining a no-buy system is straightforward because the rules are simple.
One-in-one-out, no exceptions. Every item that enters your home displaces something else. This keeps your volume constant, which means your existing storage always fits what you own.
When a container is full, that is information. A full bin means either the category has grown too large and needs decluttering, or items from outside the category have migrated in. Either way, the fix is removing items, not buying a bigger bin.
Labels on everything. Masking tape and a marker is all you need. Clear labels are what allow other family members to put things back in the right place without asking you every single time.
Monthly 10-minute audit. Once a month, walk through each room and ask whether your existing containers are still matching how the space is actually being used. Systems drift. A quick monthly check catches drift before it compounds into chaos.
Conclusion
You do not need to spend a single dollar to have a more organized home. You need a clear process, an honest declutter, and a willingness to see what you already own with fresh eyes.
Start tonight with the audit. Walk through your home and collect every container, basket, tray, box, and jar. Tomorrow, pick your most chaotic room and start matching what you collected to what that room needs. No store trip required.
When you’re ready to build a full home organization system that covers every room and every area of your home, the Organize Your Home Step by Step gives you the complete roadmap. And for a room-by-room storage deep dive, Small Home Storage Ideas has you covered.
The tools are already in your home. The only thing missing is the plan.
Also helpful: How to Declutter Your Home Fast | Closet Organization Ideas on a Budget | Minimalist home organization tips


Leave a Reply